Your dog is pacing across the yard, bringing you the same worn tennis ball, then dropping it at your feet before you’ve even finished your coffee. The usual walk and the usual toys aren’t holding their attention anymore. A DIY dog agility course can turn that restless energy into a shared activity, but the safest setup starts with your dog’s body, not with a shopping list.
Agility isn’t just a collection of jumps and tunnels. It involves acceleration, braking, turning, climbing, and landing. A home course can provide useful mental and physical enrichment, yet a poorly scaled obstacle or slippery landing can turn a pleasant Saturday project into an avoidable injury. The approach below treats backyard agility as a sport that needs progression, observation, and sensible limits.
Why a DIY Dog Agility Course Makes Sense
A homemade course gives you control over the experience. You can lower a jump for a cautious dog, remove an obstacle when the ground is wet, widen a path for a large dog, or practice one skill without committing to a full commercial layout. That flexibility matters because dogs differ widely in confidence, coordination, age, body condition, and previous training.
The activity also asks your dog to listen and solve problems. A tunnel requires confidence in an enclosed space. Weave poles require body awareness and handler timing. A pause table teaches the dog to stop and settle rather than rushing from one obstacle to the next. Those challenges make agility more than repetitive running, and the shared work can strengthen communication between dog and owner.
Structured agility has a longer history than many backyard builders realize. The sport is widely traced to a public demonstration at the Crufts Dog Show in England in 1978, was officially recognized by The Kennel Club in 1980, and saw its first licensed AKC agility trial on August 11, 1994, in Houston, Texas. The AKC now reports more than one million agility program entries annually, a sign of how a demonstration became a major canine sport. (Background on canine agility’s development)
The practical advantage of building your own
Commercial equipment can be durable and precisely made, but it may also be too tall, too rigid, or too advanced for a particular dog. DIY equipment lets you start with a few low-risk training tools and change them as your dog learns. You can use PVC for a lightweight jump frame, a stable household platform for a pause exercise, or removable poles that don’t permanently alter the yard.
The trade-off is responsibility. A homemade obstacle doesn’t come with a manufacturer’s tested construction, so you must inspect every connection, edge, surface, and anchor. A course that looks attractive can still be unsafe if a jump bar stays rigid, a tunnel shifts, or a ramp flexes under load.
Practical rule: Build for the dog you have today, not the competition dog you may want in the future.
Start with engagement, targeting, and calm movement around equipment. If your dog enjoys the work and remains physically comfortable, you can add complexity gradually. The best course is one that your dog can use confidently and safely, not the one with the most obstacles.
Planning Your Space and Safety Requirements
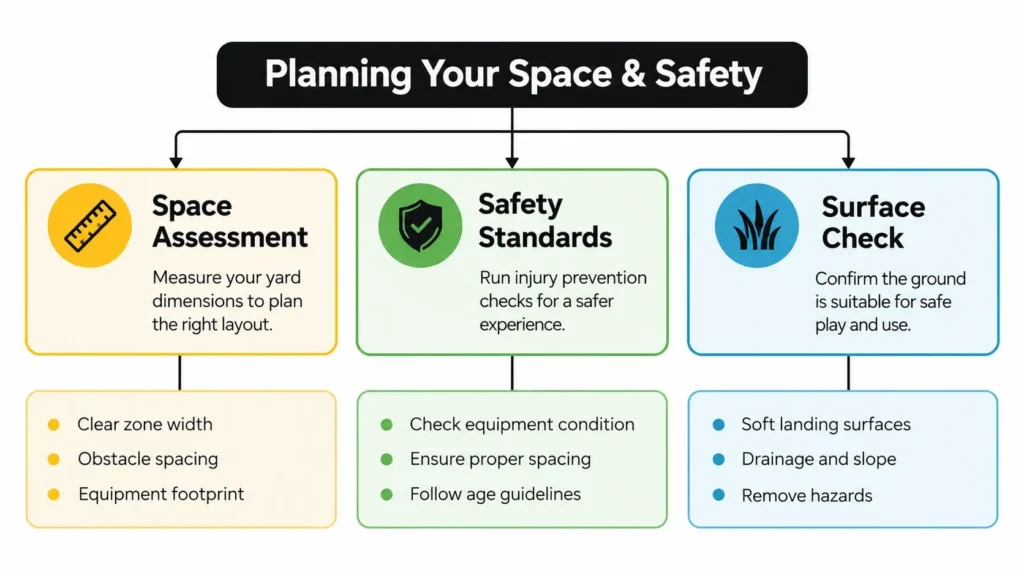
Measure the training area before cutting PVC or buying lumber. A practical basic course needs at least 20 to 30 feet by 10 to 15 feet of usable space, according to an expert DIY course guide. (Backyard course spacing and setup guidance) Remove furniture, garden tools, exposed roots, stones, toys, and anything your dog might collide with while turning.
The surface deserves more attention than the obstacle count. Choose level ground with reliable traction, and check it when wet as well as dry. Grass may offer a forgiving landing, but bare soil can become slippery or uneven, while hard paving increases impact. Secure every joint, smooth every cut edge, and reject materials that splinter, crack, or move under pressure.
Measure the dog as well as the yard
Formal rules provide useful safety benchmarks, even when you aren’t preparing for a trial. NADAC says obstacles should suit the smallest and largest dogs expected to use them, with non-slip contact surfaces and contact-zone demarcation 42 inches from the bottom of the obstacle. UKC rules similarly call for rough, non-skid top surfaces and prohibit rubber matting and carpet on most contact equipment. Poor obstacle scaling can raise injury risk by up to 38% in competitive dogs, so copying a competition obstacle without adapting it is a poor shortcut. (NADAC equipment specifications)
Plan generous run-outs instead of forcing abrupt turns. The expert guide recommends at least 15 feet between consecutive jumps, 10 feet from a jump to a tunnel entrance, and 18 feet before weave-pole entries. Those distances are planning references, not permission to make your dog run at speed. A nervous, large, young, or physically limited dog may need more room and simpler movement.
Keep the course inside a secure boundary, with no open gate or escape route near the approach to an obstacle. If the yard needs a better-defined perimeter, a practical guide to pet fencing can help you think through containment, gate placement, and the relationship between fencing and active play areas. Observe your dog’s posture, eyes, tail, and movement before raising difficulty, and use this resource on understanding dog body language to improve those observations.
Building Essential Agility Obstacles at Home
Build and test one obstacle at a time before your dog uses it. A sound obstacle stays stable during ordinary contact, has no sharp edges, and can be removed when rain, mud, or fatigue changes the risk. Lightweight equipment helps with storage, but it must not slide, tip, or collapse during a turn. Check your dog’s age, conditioning, weight, and movement quality before choosing height or complexity. Dogs with stiffness, pain, or balance problems should be assessed by a veterinarian before agility work.
Jumps
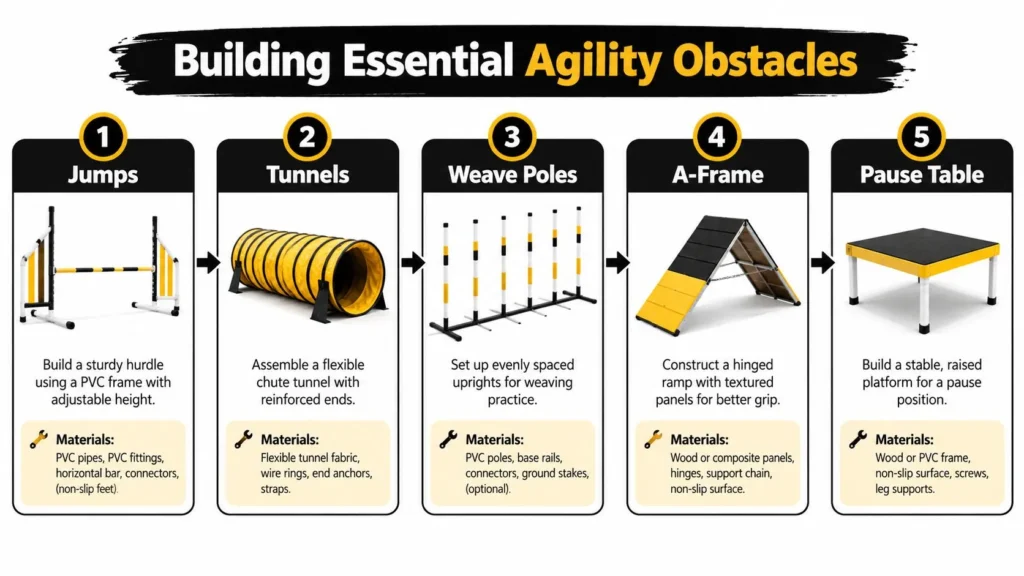
PVC pipe, corner connectors, and broad weighted feet make a practical jump frame. Set the bar on shallow cups or loose supports so it falls away on contact. Do not glue the bar into place, use a rigid broom handle, or position hard, sharp supports at shoulder level. Test the release mechanism with your hand before training.
The Kennel Club lists regulated jump heights of 300 mm, 400 mm, 500 mm, and 600 mm by dog size. These are equipment benchmarks, not automatic targets for a backyard dog. Start much lower, and choose a height your dog can step or hop over without reaching, twisting, or landing heavily. Raise it only when the dog remains controlled and comfortable. (Kennel Club dimensions and agility benchmarks)
Tunnels
An intact children’s play tunnel can introduce the behavior if it stays open, anchored, and free of exposed wire. Inspect its rings, seams, and floor before use. A tunnel that folds sharply or slides on grass can trap a paw or send the dog into an awkward exit.
Keep the entrance visible at first. Reward your dog for looking inside, then for moving through, and never push or pull a reluctant dog into an enclosed space. Place the tunnel on a surface with traction, with a straight, uncluttered exit. Stop if your dog hesitates because of darkness, noise, or unstable footing.
Weave poles
Use smooth PVC poles in weighted bases or mount them in a removable board. They should remain upright and evenly spaced, with no exposed stakes that can catch a paw. Begin with a wide channel so the dog can learn the path without forcing tight spinal rotation. Reduce the assistance gradually as coordination improves.
Weaving places repeated twisting demands on the body. It is a poor starting exercise for a dog showing stiffness, soreness, or poor balance. Keep repetitions short and controlled rather than rewarding frantic speed, especially on grass that is wet or uneven.
A-frame
An A-frame needs stronger construction than beginner obstacles. The Kennel Club benchmark uses two ramps, each 2.74 metres long by 914 mm wide, joined at 1.7 metres high. Use these proportions as a reference, not as a reason to build a full-height frame without secure bracing and suitable construction. A dog should also be physically prepared for climbing before attempting the incline.
Use sturdy timber panels, a secured hinge, and a high-friction surface that cannot peel or bunch. Mark the contact zones clearly, and check that the frame resists sideways movement when loaded. A low ramp or flat board gives a safer introduction. If your dog changes stride, slips, or jumps off the side, lower the challenge and inspect the structure.
Pause table
A pause table still needs a broad, stable base and a non-slip top. Use exterior-grade timber, rounded edges, and a surface that will not peel into pieces. Introduce it as a station for standing, sitting, or lying down before adding duration. Keep the platform low enough for your dog to step on and off without a jarring landing.
Permanent outdoor equipment also depends on the ground beneath it. This guide to dog run drainage and materials covers ground preparation and surface choices. Prevent water from pooling around obstacle feet, since mud can make a stable structure hazardous.
A visual demonstration can help compare obstacle shapes before construction. Use the video for general building ideas, then adapt every dimension, surface, and height to your dog instead of copying it automatically.
Layout Designs for Different Yard Sizes
A narrow yard rewards restraint. Fit a short sequence rather than forcing every obstacle into one strip. A ground bar, tunnel, and pause table can provide useful variety, provided each has a clear approach and exit. Rotate the direction of travel between sessions, and keep turns broad enough that your dog does not have to brake or twist sharply.
Separate teaching space from running space. In a compact layout, work on the bar with a straight approach, then move to the tunnel only after your dog has slowed and reoriented. Finish at the pause table, where movement can settle. If the yard cannot provide a safe run-out, remove the jump or keep the bar on the ground. A smaller course is safer than a fast course with nowhere to stop.
Larger yards work better as defined lanes than as scattered equipment. One lane can combine a low jump and pause table, another can hold the tunnel, and a third can lead toward weave poles. Keep traffic predictable and leave room around every obstacle for a controlled exit. More space can reduce collisions, but it can also encourage continuous sprinting, so place rest points between sequences.
| Yard situation | Sensible starting layout | Main safety trade-off |
|---|---|---|
| Narrow or compact area | Ground bar, tunnel, pause table | Less speed, more focus on handling |
| Medium lawn | Low jump, tunnel, poles, pause table | Requires careful approaches and exits |
| Broad, level yard | Separate training lanes with gradual sequences | More room can encourage excessive speed |
Use benchmarks without turning practice into competition
Use the competition height categories introduced earlier as a reference, but set your home bar substantially lower based on your dog’s comfort, structure, conditioning, and veterinary guidance. Formal equipment standards help classify obstacles, not decide what an individual dog should repeat. A non-slip surface, stable footing, and a bar or component that can give way reduce the consequences of a mistake.
A veterinary assessment matters when your dog is young, older, recovering from injury, carrying extra weight, or showing stiffness after exercise. Athletic ability alone does not make repeated jumping appropriate. A small dog may need low-impact work, while a larger dog may also require reduced height and fewer repetitions to protect joints.
Plan the yard before fixing equipment in place. Mark boundaries, gates, trees, drainage paths, and any hard surface that could turn a fall into an injury. An online tool that lets you design your backyard online free can help test traffic flow and obstacle spacing before construction. Recheck the layout after rain, since pooling water and soft ground can change how safely a dog approaches, lands, and turns.
Training Progression from Beginner to Advanced
A safe course needs a safe learning order. Begin with attention, a hand target, and a reliable reward marker such as a clicker. The dog should understand how to follow you, stop, and return to you before you add speed or equipment.
Introduce each obstacle separately. Reward a glance at the tunnel, a step toward the pause table, or a calm walk over a ground bar. Keep the handler’s movement slow enough that the dog can process the instruction. If the dog hesitates, lower the challenge instead of luring harder or physically guiding the body.
Build skill in layers
Beginner work should consist of individual obstacles and easy rewards. A dog might walk through a visible tunnel, cross a low bar, or stand on a stable platform. End while the dog is still engaged, not after repeated mistakes.
At the intermediate stage, connect two obstacles with a generous line between them. Add weave-pole work carefully and watch whether your dog stays balanced, relaxed, and responsive. Only introduce distractions after the dog can perform the behavior calmly in a familiar setting.
Advanced training can include longer sequences, contact-zone discipline, and more precise handler cues. Speed should be a by-product of confidence, not the objective that drives every session. A useful guide to how to train your dog can support the reward-based foundation that agility depends on.
Know when agility is the wrong activity
Veterinary guidance should come before equipment for puppies, senior dogs, overweight dogs, and dogs with joint concerns. Young dogs can injure developing joints, while hard or slippery surfaces increase risk. Dogs with pain, lameness, unusual stiffness, or a recent injury may need a low-impact alternative or a professional rehabilitation plan instead of a backyard course. (Veterinary-first guidance on dog agility)
After practice, watch for reluctance to climb stairs, shortened stride, persistent licking, difficulty rising, or a change in enthusiasm. A dog can mask discomfort, so a subtle performance change deserves attention. Stop the session if movement becomes uneven, the dog repeatedly misses an obstacle, or the dog can’t settle afterward.
Warm the dog up with calm walking and easy movement before obstacle work, then finish with relaxed walking. Inspect the course every time you use it. Tighten loose fasteners, replace cracked PVC, check tunnel seams, test the jump release, and remove any surface that has become slick or detached.
A confident refusal is useful information. If your dog backs away from an obstacle, treat that response as feedback about the design, the training step, or the dog’s physical comfort.
Budget Options and Long-Term Success Tips
Spend first on traction, stability, and breakaway behavior, not on paint, decorative finishes, or a large obstacle collection. PVC offcuts can form a simple jump frame, removable poles can support weave practice, and a sturdy platform can become a pause table. Repurposed materials are acceptable only when they remain smooth, stable, clean, and free from hidden fasteners or toxic coatings.
A small course often works better than an ambitious one. You can add equipment after you know how your dog moves, what surfaces remain safe in your weather, and which exercises hold attention. For a realistic view of training-related expenses and professional support, consult this guide to dog training cost.
Store removable equipment out of direct weather, dry tunnels before folding them, and inspect wood for swelling or splinters. Recheck the course after heavy rain, frost, or yard work. The durable setup is the one you can inspect quickly and adjust without hesitation.
Start with a veterinary check when your dog has any age, weight, joint, or mobility concern. Measure the space, create a low-impact layout, build a breakaway jump, and teach one obstacle at a time. If the dog remains loose, eager, and coordinated, you can progress. If not, enrichment walks, scent games, targeting exercises, and controlled balance work may be the better choice.
maxijournal.com offers approachable writing on pets, health, sports, and practical everyday topics, including guidance that can help you make better decisions about training and enrichment. Visit maxijournal.com to discover more useful articles for building a safer, more informed life with your dog.
Discover more from Maxi Journal
Subscribe to get the latest posts sent to your email.