You’ve just beaten Brock, watched the Boulder Badge join your case, and discovered that the next route isn’t as simple as walking straight to the next gym. Perhaps a traded Pokémon is ignoring commands, an HM still won’t work outside battle, or a guide has told you three different answers about which badge lets you use Surf. FireRed’s badges create exactly these moments of confusion because they do much more than mark story progress.
Pokémon FireRed and LeafGreen preserve Kanto’s classic gym journey as a modernized remake of the original adventure. The path still leads through eight badges, ending with the Earth Badge and the Pokémon League at Indigo Plateau. The complete sequence is Boulder, Cascade, Thunder, Rainbow, Soul, Marsh, Volcano, and Earth, as documented in the FireRed and LeafGreen game overview.
This guide treats every badge as part of a working system. You’ll learn where each gym is, which leader you’ll face, what the badge changes, how HM access and obedience rules fit together, and how to turn the final badge into a practical Elite Four preparation plan. If you enjoy classic adventures and want more gaming context alongside your Kanto journey, explore this guide to the best Pokémon of all time.
Introduction to Pokémon FireRed Badges and Your Kanto Journey
Brock’s Boulder Badge is the first moment when FireRed’s world opens up. Before it, you’re mostly learning how routes, wild encounters, items, and battles fit together. After it, the badge case becomes a visible record of progress, and the game starts asking you to use that progress in several different ways.
A new player may reasonably think, “I defeated the Gym Leader, so I collected a trophy.” That’s only part of the story. A badge can make a Pokémon obey, improve a battle stat, permit an HM outside combat, or remove a major story obstacle. Think of each one as both a milestone marker and a permission slip.
FireRed follows the original Kanto badge framework rather than replacing it with a larger regional system. The result is a familiar route through Pewter City, Cerulean City, Vermilion City, Celadon City, Fuchsia City, Saffron City, Cinnabar Island, and finally Viridian City. The fixed order is important because the map gradually gives you access to places that were unreachable earlier.
The journey in plain language
The first gyms teach the basic rhythm of Pokémon battles. Brock introduces type matchups and defensive thinking. Misty tests whether your team can handle strong Water attacks. Lt. Surge adds an environmental obstacle and makes preparation matter more.
Later gyms demand broader answers. Erika expects you to recognize Grass weaknesses, Koga combines Poison pressure with a confusing layout, Sabrina punishes teams that lack a plan for Psychic Pokémon, and Blaine tests Fire-resistant options. Giovanni closes the gym circuit with the Earth Badge, but that victory is a doorway to the League rather than proof that your team is ready for it.
A badge isn’t just something you collect. It changes what you can do, what your Pokémon can use, and which parts of Kanto are open to you.
The rest of the guide follows the adventure in the same order you’ll experience it. First, you’ll learn the two mechanical systems behind badges. Then you’ll get the complete gym route, a precise badge reference, battle strategies, navigation tips, and a preparation bridge for Indigo Plateau.
How Gym Badges Actually Work in FireRed
FireRed badges operate through two separate systems. The first affects battle performance and traded Pokémon obedience. The second controls field progression, including when certain HMs work outside combat. Confusing these systems is the main reason badge explanations often feel contradictory.
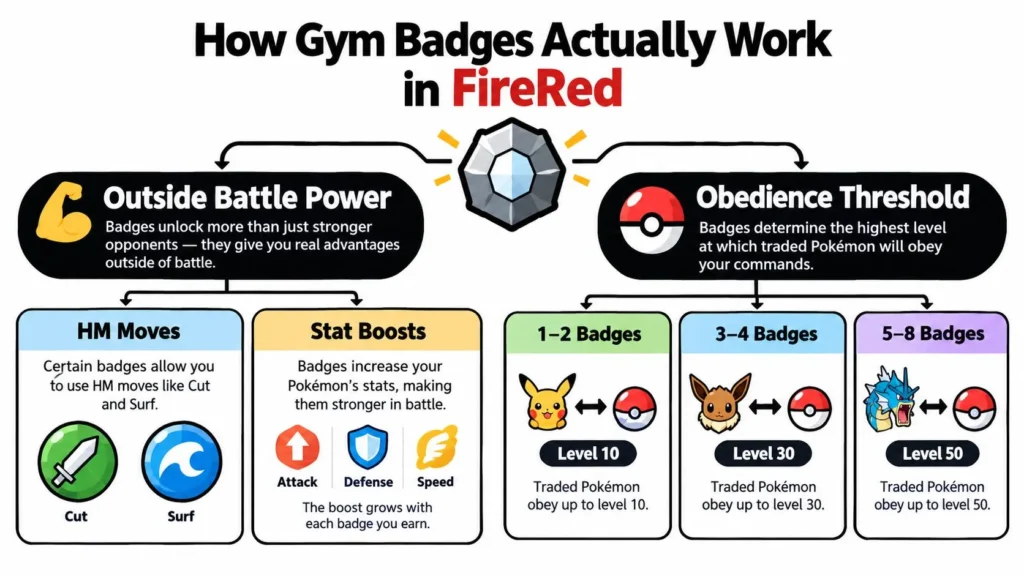
Badges as battle power
In Generation III, Gym Badges can grant a 10% boost to a specific stat in battle, and FireRed and LeafGreen are among the games where that mechanic applies, as summarized in this badge stat-effect discussion. Four badges are tied to these stat boosts.
The effect isn’t a visible level increase. Your Pokémon doesn’t gain experience, learn a move, or show a new number in the same way it would after leveling. Instead, the relevant battle calculation receives the badge-related benefit. That makes badges function like quiet power-ups attached to your whole party.
Badges as obedience permissions
The other four badges govern the level thresholds for traded Pokémon. Those thresholds are 30, 50, 70, and 100, and the order in which you earn badges determines when Pokémon received from another player will reliably follow commands. This doesn’t usually affect Pokémon you caught and trained yourself, which is why a new player may never notice the system until a traded Pokémon starts using the wrong move or loafing around.
A useful analogy is to imagine two doors in the same building:
- Battle door: Certain badges improve a stat category during fights.
- Command door: Other badges raise the level at which traded Pokémon obey.
- Field door: Specific badges let you use important HMs outside battle or pass a story gate.
These doors may be connected to the same badge case, but they don’t all open for the same reason.
Why order matters
Badge order changes your practical options. You can have a powerful traded Pokémon in your party and still lack the obedience permission needed to control it. You can also possess an HM but be unable to use it in the field because the relevant badge hasn’t been earned.
The badge sequence therefore acts like a chain of keys. One key improves your battle readiness, another lets you command stronger traded Pokémon, and another allows you to cross water or move an obstacle. Treating every badge as a generic trophy hides the decisions the game is asking you to make.
All Eight Gym Badges in Order and Where to Find Them
The Kanto route is fixed in FireRed. You’ll earn the Boulder Badge from Brock, then continue through the sequence until Giovanni awards the Earth Badge in Viridian City. The badge names and route preserve the original eight-gym structure, which is one reason FireRed feels like a refreshed version of a foundational Kanto adventure rather than a completely new region.
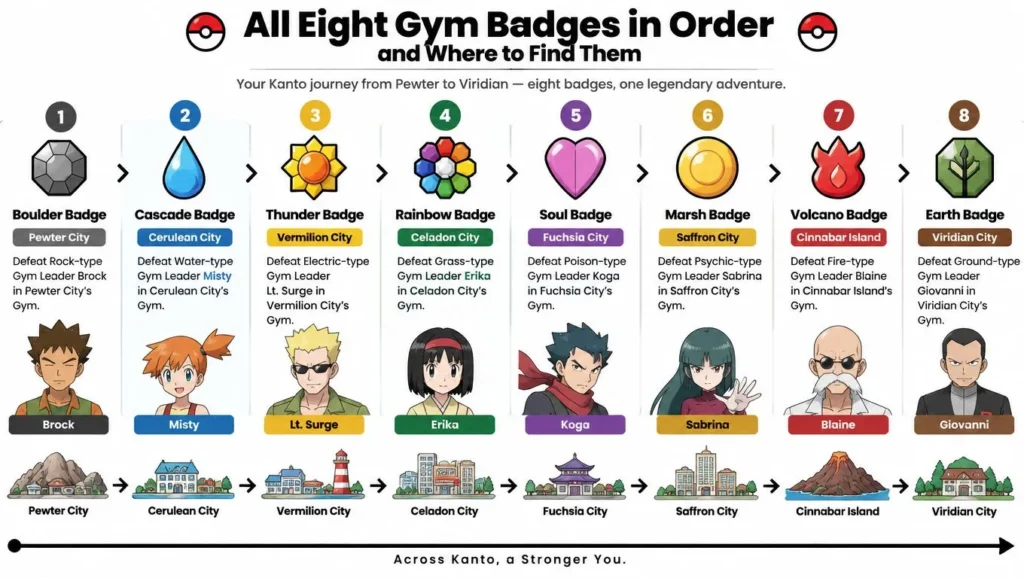
The route from Pewter to Viridian
Boulder Badge, Brock, Pewter City
Brock is the first Gym Leader and specializes in Rock Pokémon. His badge begins the formal Kanto progression and establishes the first major story checkpoint.Cascade Badge, Misty, Cerulean City
Misty’s Water-focused gym sits northeast of Pewter City. After reaching Cerulean, you’ll need to deal with the local story events before the gym path becomes straightforward.Thunder Badge, Lt. Surge, Vermilion City
Vermilion City is reached after traveling through the route network south of Cerulean. Lt. Surge’s gym is the first place where a badge reward is closely associated with both a battle system and an important field progression option.Rainbow Badge, Erika, Celadon City
Celadon is a major commercial city with several important buildings, so it’s easy to spend time exploring before entering Erika’s Grass gym. The Rainbow Badge also has an important field and obedience role later.Soul Badge, Koga, Fuchsia City
Fuchsia City lies farther south and serves as a gateway to the Safari Zone and the later route toward Cinnabar Island. Koga’s Poison gym combines status pressure with a navigation puzzle.Marsh Badge, Sabrina, Saffron City
Saffron becomes accessible as the central story develops. Sabrina’s Psychic gym is famous for its teleport panels, which can make the route feel more complex than the battles themselves.Volcano Badge, Blaine, Cinnabar Island
Blaine’s Fire gym is located on Cinnabar Island. You can’t approach this gym as part of the normal sequence until your team has the field access needed to travel across the water route from Fuchsia.Earth Badge, Giovanni, Viridian City
Viridian’s gym is the final stop. Giovanni awards the Earth Badge, and this is the last required gym milestone before the Elite Four challenge at Indigo Plateau.
The badge path is geographic as well as narrative. Kanto gradually sends you outward from the early northern cities, through the central and southern routes, across the sea to Cinnabar, and back to Viridian for the closing gym battle.
For a broader look at how flying-related mechanics work in Pokémon battles, you can also read this guide to Flying-type Pokémon weaknesses.
What Each Badge Grants From HMs to Obedience
A badge serves two purposes in Pokémon FireRed. It improves your trainer progression and gives you permission to use certain field moves or command traded Pokémon. Keep those roles separate, like tracking both a road pass and a team’s obedience.
Badge effects and field permissions at a glance
| Badge and Leader | City and Order | Confirmed Effect or Permission |
|---|---|---|
| Boulder Badge, Brock | Pewter City, first | Marks the first major step in the Kanto story. |
| Cascade Badge, Misty | Cerulean City, second | Adds to the badge-based obedience progression. |
| Thunder Badge, Lt. Surge | Vermilion City, third | Contributes to a badge-based stat effect and field progression in FireRed. |
| Rainbow Badge, Erika | Celadon City, fourth | Allows traded Pokémon up to level 50 to obey and enables Strength in the field, according to the FireRed and LeafGreen walkthrough documentation. |
| Soul Badge, Koga | Fuchsia City, fifth | Provides a key field-progression step and contributes to the obedience system. |
| Marsh Badge, Sabrina | Saffron City, sixth | Contributes to a badge-based stat effect and field progression. |
| Volcano Badge, Blaine | Cinnabar Island, seventh | Comes after the Soul Badge, since Surf access is needed for the usual route to Cinnabar Island. |
| Earth Badge, Giovanni | Viridian City, eighth | Completes the gym sequence and meets the badge requirement for the Elite Four. |
The table keeps confirmed effects separate from assumptions found in simplified guides. Surf, Fly, and Strength shouldn’t be assigned to a badge by guesswork. HM access and badge order connect to one another, but they are not interchangeable labels.
Why Surf causes so much confusion
The Soul Badge comes before the Volcano Badge because the normal journey to Cinnabar Island crosses water. Koga’s badge therefore acts as the practical travel gate for the southern route, while Blaine’s badge comes later at the destination.
This distinction helps with a common mistake. A quick guide may list Surf, Fly, and Strength together, then make it unclear which badge matters for the obstacle ahead. Check the field action blocking your route, then confirm which badge supports it instead of relying on a disconnected reward list.
Practical rule: Match the badge to the obstacle in front of you, not to a memorized list that may have mixed up HM permissions.
Rainbow Badge has a direct effect: traded Pokémon up to level 50 obey, and Strength works in the field. Earth Badge has a different role. Giovanni’s final badge completes the gym requirement for the League, yet it does not prepare your team by itself. Before entering Indigo Plateau, check levels, type coverage, healing items, and the moves your team can depend on. Badges open the route through Kanto, while that final preparation determines whether your party can handle what waits beyond it.
Recommended Teams Levels and Strategies for Every Gym Leader
A good gym plan doesn’t require a perfect team. It requires recognizing the leader’s type, bringing at least one reliable answer, and avoiding the mistake of letting a single overused starter carry every battle.
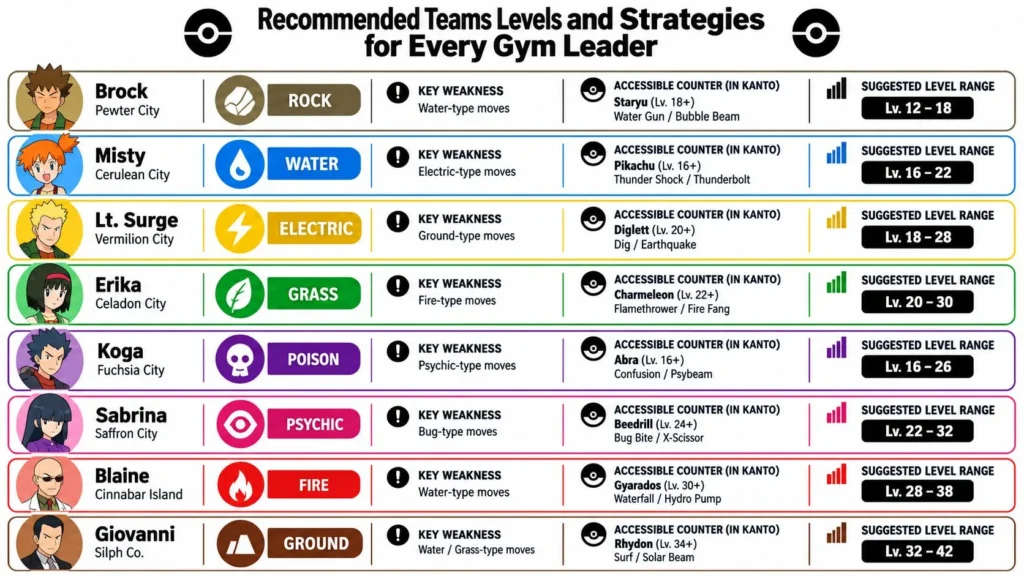
Brock and Misty
Brock, Rock type: Bring Grass or Water coverage whenever possible. Bulbasaur has a natural advantage, Squirtle can answer Rock Pokémon directly, and Charmander players should consider catching a suitable Pokémon on the early routes rather than forcing a difficult fire-only fight. Physical attacks may feel weak against Rock Pokémon, so type advantage matters more than just choosing your highest-level party member.
Misty, Water type: Electric and Grass moves are the clean answers. Pikachu can help if trained carefully, while an available Grass Pokémon gives you a second way to pressure Water targets. Don’t assume a single super-effective hit will end the fight. Keep a backup plan in case your first counter is slowed, weakened, or knocked out.
Lt. Surge and Erika
Lt. Surge, Electric type: Ground moves are the central answer because Electric attacks can’t normally affect Ground Pokémon. Diglett is an accessible example from the nearby cave area, and a Ground Pokémon can also give your team useful coverage beyond this one gym. Watch for the gym’s puzzle, but prepare for the battle separately.
Erika, Grass type: Fire, Flying, Bug, Ice, and Poison coverage can all help, depending on your team. Fire starters and common Flying Pokémon are straightforward choices, but don’t ignore status conditions. Grass Pokémon often carry moves that create problems over several turns, so a quick knockout is safer than a slow exchange.
If you’re curious about deeper training systems, keep competitive-style effort training separate from ordinary story preparation. This EV training guide can help explain the distinction without making it necessary for a normal FireRed playthrough.
Koga and Sabrina
Koga, Poison type: Ground and Psychic moves are valuable, but status effects can decide the fight. Bring antidotes or use a Pokémon that can end battles quickly. Koga’s gym is also a reminder that a team needs defensive variety. If every member relies on physical attacks, Poison Pokémon with defensive advantages can slow your progress.
Sabrina, Psychic type: Bug, Ghost, and Dark options can help, but focus on reliable damage rather than a fragile counter that falls immediately. Psychic attacks are dangerous when your team has low special resistance. A Pokémon that can survive one hit and respond consistently is often more useful than an apparently perfect counter with poor durability.
Blaine and Giovanni
Blaine, Fire type: Water, Ground, and Rock moves are the main tools. A Water Pokémon that has been useful since Misty can become valuable again, while Ground and Rock coverage give you alternatives if Fire attacks threaten your primary counter.
Giovanni, Ground type: Water, Grass, and Ice moves are effective answers. Giovanni’s final battle rewards a balanced team because Ground Pokémon can be challenged from several angles. Don’t bring only one counter. If it becomes confused, weakened, or defeated, the rest of your party still needs a route to victory.
For level planning, use the game’s difficulty as your guide rather than chasing a single magic number for every gym. Keep the team members you intend to use reasonably close in strength, and add a little extra preparation before unfamiliar late-game fights.
How to Reach Each Gym With Simple Maps and Walkthrough Tips
Gym battles are only half the obstacle. Several FireRed gyms hide their route behind visual puzzles, locked doors, teleporters, or invisible barriers. The best approach is to treat each room as a process of elimination instead of wandering randomly.
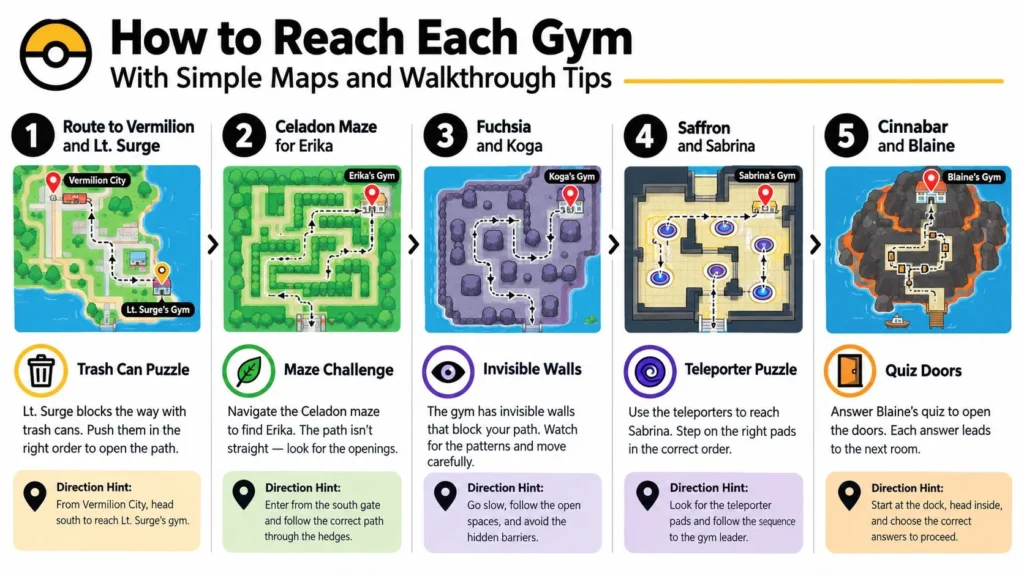
Follow the regional flow
- Pewter to Cerulean: Travel east from Pewter, then follow the northern route toward Cerulean. Brock’s gym is direct, while reaching Misty requires handling the city’s surrounding story events.
- Cerulean to Vermilion: Continue through the route network and use the underground passage where appropriate. Vermilion’s harbor location makes it the natural next stop.
- Vermilion’s trash-can puzzle: Search the cans systematically. The first correct switch determines the location of the second, so once you find one, inspect nearby cans rather than restarting at random.
- Celadon’s gym maze: Erika’s gym uses small barriers and trainer sight lines. Move through the open spaces carefully, and use the available gaps instead of trying to walk directly toward the leader.
- Fuchsia’s invisible walls: Koga’s gym contains barriers you can’t see. Watch how trainers are positioned and move in straight, deliberate paths. The room layout rewards patient exploration.
- Saffron’s teleporters: Sabrina’s gym connects rooms through teleport panels. Use them as a route puzzle, and remember where each panel sends you so you don’t repeat an unhelpful loop.
- Cinnabar’s quiz doors: Blaine’s gym lets you answer questions or battle trainers to open the route. If you want to avoid an unnecessary fight, read each question carefully before choosing.
The important travel link is Fuchsia to Cinnabar. Once Surf is available for the route, travel across the water to the island rather than searching for a hidden land route that isn’t there.
After Your Eighth Badge Preparing for the Elite Four
The Earth Badge finishes the gym circuit, but it doesn’t finish the preparation. Giovanni’s defeat proves that you’ve cleared Kanto’s required badge gates. The Elite Four will test whether your party can keep functioning through a longer sequence of difficult battles.
Community advice commonly points players toward level ranges around 55 to 60 before attempting the League, with player discussion about FireRed preparation also highlighting VS Seeker rematches on Cycling Road and routes near Fuchsia as practical training options. Treat that range as a preparation target, not a guarantee. A team with varied moves and dependable matchups can perform better than a higher-level group built around one type.
A simple post-badge checklist
- Train the whole active team: Don’t leave one or two Pokémon far behind while a single starter handles every fight.
- Build type coverage: Carry answers for the different battle styles you’ll face instead of relying on one super-effective move.
- Use VS Seeker rematches: Cycling Road and areas near Fuchsia are useful places to revisit trainers when you want repeatable battles.
- Review moves: Replace weak early-game attacks when you have stronger, more accurate options.
- Stock useful items: Carry healing items and status cures so one unlucky condition doesn’t end a long run.
- Save before entering: A saved game gives you a clean attempt if your first League strategy fails.
Badges are the framework that gets you to Indigo Plateau. Your final preparation turns that framework into a team capable of finishing the journey.
Explore maxijournal.com for approachable gaming guides, education, technology, and entertainment articles that make complicated topics easier to follow. Visit the site for fresh independent writing and practical explanations you can return to after your next Pokémon adventure.
Discover more from Maxi Journal
Subscribe to get the latest posts sent to your email.